Friday, May 28, 2010

Introducing: The Big Clamp

How did the headboard turn out? I'm glad you asked!


I love it. I even *heart* it. We might be going steady, me and my headboard. It got one more coat of stain after this and then it got moved into it's happy home in our bedroom. It's gorgeous and it makes me happy every time I look at it.

So! On to the kitchen table. My original plans were for the Rustic Table but I wanted different legs. Also, my father loaned me his Kreg Jig, so it was suddenly possible to attach the apron to the legs at the sides.

I got all the holes drilled, the legs attached, the apron assembled, and then I got it set in the kitchen to make sure it was the right size.

I'm not sure if I thought we would be feeding the Partridge family or what, but that table was WAY too big for us. And that's *after* I whacked a bunch off the original measurements in the plans. So I whacked some more off. And then I realized that I needed to shorten the ends as well, which involved drilling out the putty and *then* whacking some more off. Finally it's all the right size and the unassembled wood sits in the kitchen taunting me for a week while we unpacked and unpacked and unpacked (and we're not done yet).

Last weekend Steve went off to a camping trip ahead of me and I took advantage of the evening to myself to lay out the pieces and paint them. I wanted a dark stained top and a white base so I put a coat on and decided to go to bed and let it really dry before putting another coat on and letting it finish drying while I went camping.

Then I came back down to get myself some water and I turned on the lights and damned if there wasn't a moth dying in my fresh paint. Just laying on his back flapping around in the Valspar Eggshell Interior Deluxe. I freed him to the best of my ability, redid that bit, and called it a night.

When I got home from camping I did the assembly and got the top attached. And then I detatched and reattached the top. Twice. And then I realized I had a seriously swoopy board in there somewhere. Also that I don't put enough "sink" in my countersink holes. I made a shopping list to remedy some of my issues and put an initial coat of stain on it and went to bed.

Here it is that night:


OMG stop looking at how messy my kitchen is! I swear we've made progress! Anyway, at this point I went to bed.

The next day I went to the Big Orange Store and got clamps big enough to hold down the swoopy board, longer screws, wood putty, all that good stuff.

Oh, Wood Putty, I love you best of all.


By the time the putty got put on I'd already clamped down the edges and really gotten rid of the gaps, put the correct size screws in, all that good stuff. Sometimes I'd bring the big clamp back out and show it to the table, just to scare it.

See the table quaking in fear? Wood trembles at the very approach of The Big Clamp.


Eventually I got it buffed, polished, smacked around, and more stain on it. Then I moved it outside. Because if it's going to be 90 around here, I'm going to take advantage of it.


Last night Steve and I had the discussion about whether or not it's done. It usually goes like this:

Me: I think it needs another coat of stain.
Steve: I think it's fine.
Me: You don't think it looks uneven?
Steve: No, honey, I think that's just the light.
Me: Well maybe just a touch-up on a couple of spots.
Steve: *twitch*

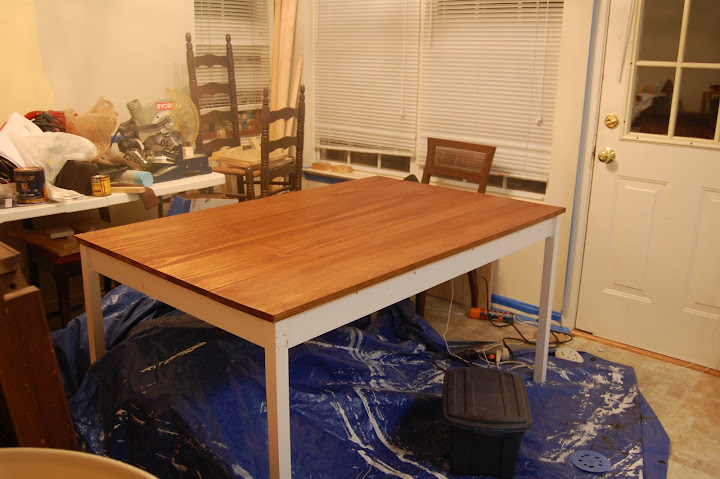
And then I wait until he goes to bed and I put some more stain on it anyway. Of course now I *have* to be done because I'm out of stain. Somewhere Steve is very happy. This is how it looked after the last stain coat. It'll get poly on the top and some putty/sanding/touchup paint on the base and it's done!


(You're looking at how messy the kitchen is, aren't you? You don't see the messy kitchen. You see only the gorgeous table. This is not the messy kitchen you're looking for. (I just made a big HTML nerd joke, I have no shame.)

Now we're on to the Rustic Media Center, the base of which you see trying to hide under the table in disguise as a bench. I think it's afraid of The Big Clamp.


Saturday, May 8, 2010

Homely Hall of Shame makes good

Later, when we're sitting around having coffee and chatting about power tools, let's pretend my that I don't do most of my projects in the kitchen. Also, let's pretend my kitchen doesn't look this bad. In my defense, we just finished moving in today and most of that stuff will be put away by Tuesday. But for now, let's just wave our Magic Wand of Martha Stewart and pretend this is a nice shiny workshop somewhere with all the tools on pegboards and stuff instead of on my counters.


Here you can see that I've embraced the clamps and I'm letting my air compressor irritate my neighbors until it's got enough juice to let me nail these together while holding the nailer like I'm on a SWAT team.

Ana's original plan calls for 1x4's and 1x6's for the panel boards. I am lazy and also I know myself well enough to know that mine would have had gaps and been uneven and whatnot. So I cheated improvised and used 1x6 tongue-in-groove flooring. It gives me a little fudge factor in the alignment of the boards and it appeases my husband who wanted something just a little less rustic. They worked like a charm. This is the back.


And this is the front. I think they look pretty good. You get a clear line between the boards, but there's no gap so that makes me happy.


Mmm... clamps. Mmm.. strawberry cake on the counter. We have houseguests who came in to help us move and when the menfolk went to get dinner they came back with cake. Works for me.


Ahh, another Saturday night at Chez Melly.


And voila! Y'all, seriously, this took less than an hour to put together. The nice guys at the Orange Store cut the lumber for me, and thanks to my square it actually went together with 90 degree angles and everything. It's going to get another 1x4 on top and crown molding on top of that just because I got 8' of solid maple crown molding for $2 at my local Restore and I can't pass that up. Plus, again, Steve wanted a little less rustic and the molding gives it a more polished look. However, that will have to wait until tomorrow when I can run the miter saw and only piss of the neighbors a little bit, as opposed to doing it at 11pm, which will ruin my chances of ever getting their daughter to babysit.


It needs a couple of good rounds of sanding and an epic amount of wood conditioner before it can get stained, but I'm so tickled!

Who doesn't love wood putty? Though next time I'll put on a pair of surgical gloves before I wipe it in with my fingers. It's currently forming a stainable, paintable, sandable bond under both pinky nails.


And today's lesson learned is this: If you think to yourself 'This is really hard to do from this angle' you should stop and stand up and move to a more comfortable position. Because I don't care what your college boyfriend told you, nothing is ever made easier or more fun by doing it at an awkward and uncomfortable angle. Especially if it involves a nail gun.

On that note, it's bedtime. Because tomorrow for Mother's Day my husband is giving me a few hours alone to hang out with my tools and my books on tape and quart of wood stain. *happy sigh*

Posted by Picasa

Thursday, May 6, 2010

I wouldn't even take it out on a pity date.

So I stumbled upon Ana's Knock-Off Wood site a few weeks ago and I got all ambitious about furniture for the house. I don't need complicated dovetail joints or fancy scroll work, I just need nice sturdy furniture that doesn't look like it came from a dorm room or would tear in half if you leaned on it funny. Also, me and Steve are big on books, we need Serious Bookcases. Steve, who is just ridiculously supportive of me, got me a nail gun. I got some plans printed out, we were good to go. And then Ana put up the plans for this:


Looks simple, eh? Yeah, I thought so, too. I thought it would be a good starter project before I got into tables and headboards and such. And then came the lesson in humility. Because y'all, I made this:


Is that not the homeliest lookin' piece of carpentry ever? I know there's a rafter's square in the picture but apparently I thought it was just for show, because I certainly didn't use it. This piece is so sad and off-square and not flush and just hanging out in the corner with the girl who still wears headgear for her braces. But don't feel pity for it. Because it's mean. It taunts me.


See it!? See it just sitting there with it's little edges. They're not only not flush, the vertical leg in this picture is uneven at the end so there's a gap. This is where my father went "Wow, it did that even after you made sure and checked for plumb and flush on your saw blade?" And then I just blinked a lot like "Well of COURSE I did that." And then I said "Show me how *you* do it. Because I'm stealthy like that.

Boys and girls, it was off by not much, a degree and a half, perhaps. But when it comes to seating boards right up next to it, that makes a huge difference. Plus, it's lookin' at me funny.

And don't miss that screw in the back that won't go in any further.


How do I know it's going to stick up that way forever? Simple.

I stripped the bejeezus out of it trying to get it in. I'm good like that.
At this point I put the top boards on and then I cried little teary tears of "why is this so hard!?" and then realized I hadn't had lunch or dinner and that I was probably tired, hungry, cranky, and in real need of a nap. Things got better after that.

We moved into the new house and I decided to start with something I had some vested interest in and real need for. Instructables (sorry to cheat on you, Ana!) has a great plan for a super-easy platform bed. As a person always in need of storage space and not attached to the idea of a box spring, I'm a big fan of platform beds. I made the one we've been sleeping on for the last 7 years but it's mostly plywood screwed on to 6x6 posts, so it's not really a feat of engineering achievement.

Also, when we tried to get it out of the old house it was such a pain. And the screws were in so tight that bits of it wouldn't actually come apart. I wanted a bed I could take apart, that would be sturdy and easy to fix if something went wrong, and something that (even though it's *under the bed*) wouldn't look like it was dorm furniture (the plywood and 6x6s look like they came straight out of Rush Week).
I grabbed the lumber, just 2 2x4s and some 1x4s and then I went through the epic process of trying to get two cuts done. Two. Eventually the nice guy in the orange apron said "Are you sure you feel comfortable using a saw?!" Buddy, do not start. In my house the nail gun belongs to ME and I'm the one who snakes the drain.
Anyway, at this point I took my lumber home and learned important lessons about the Value of Clamps. Do not underestimate the power of clamps. Clamps will save your ass. Clamps are like being an octopus with very very strong hands. Drilled pilot holes and then carted my drill (who needs a name) upstairs and built my bed.

Check it out, baby's first 90 degree angle. My parents would be so proud. *sniff*


What you see if you're the monster under my bed:


It is level, square, sturdy, everything fits, and it doesn't wobble when I get into it. I'm calling that a success.


And after firing up my nail gun last night just to see how loud it was (lessons learned: a) it's not that loud and b) those pieces of scrap wood had it coming to them, wily bastards) I'm moving on to the headboard. Maybe, if Dad leaves me the Kreg jig when he departs this morning I'll tackle some of the table, too. Duck and cover, folks.